
HMS PEGASUS (1776) in Scale 1/64 (Workshop on examples/Практикум на прикладах)
- Olha Batchvarov
- Apr 16, 2022
- 6 min read
Updated: Apr 1, 2023
Step-By-Step Guide for beginners/ Покроковий посібник для початківців
Chapter #6/Розділ №6
Coppering the hull/Влаштування мідної обшивки

The first coppering on the model was made in the middle of the 18th century to demonstrate to King George III how it could protect the bottom of the ship and reduce the cost of maintaining the fleet! Probably this was demonstrated on the Bellon model, at least its model has a copper sheets, which was made in the same period with the observance of technology as on real ships. The copper plates usually overlapped from the stern to the bow and from the top to the keel. Although there were occasional exсeptions.
Вперше мідну обшивку на моделі було виконано у середмні XVІII століття для демонстрації королю Джоржу ІІІ, як це зможе захистити днище корабля та зменшити вартість утримання флоту! Імовірно це було продемонстровано на моделі Беллона, принаймні її модель має мідну обшивку, яку зробили в цей самий період з дотриманням технології як на справжнії кораблях. Мідні пластини зазвичай вкладали внахлест від корми до носа і від верху до кіля. Хоча час від часу траплялися винятки.

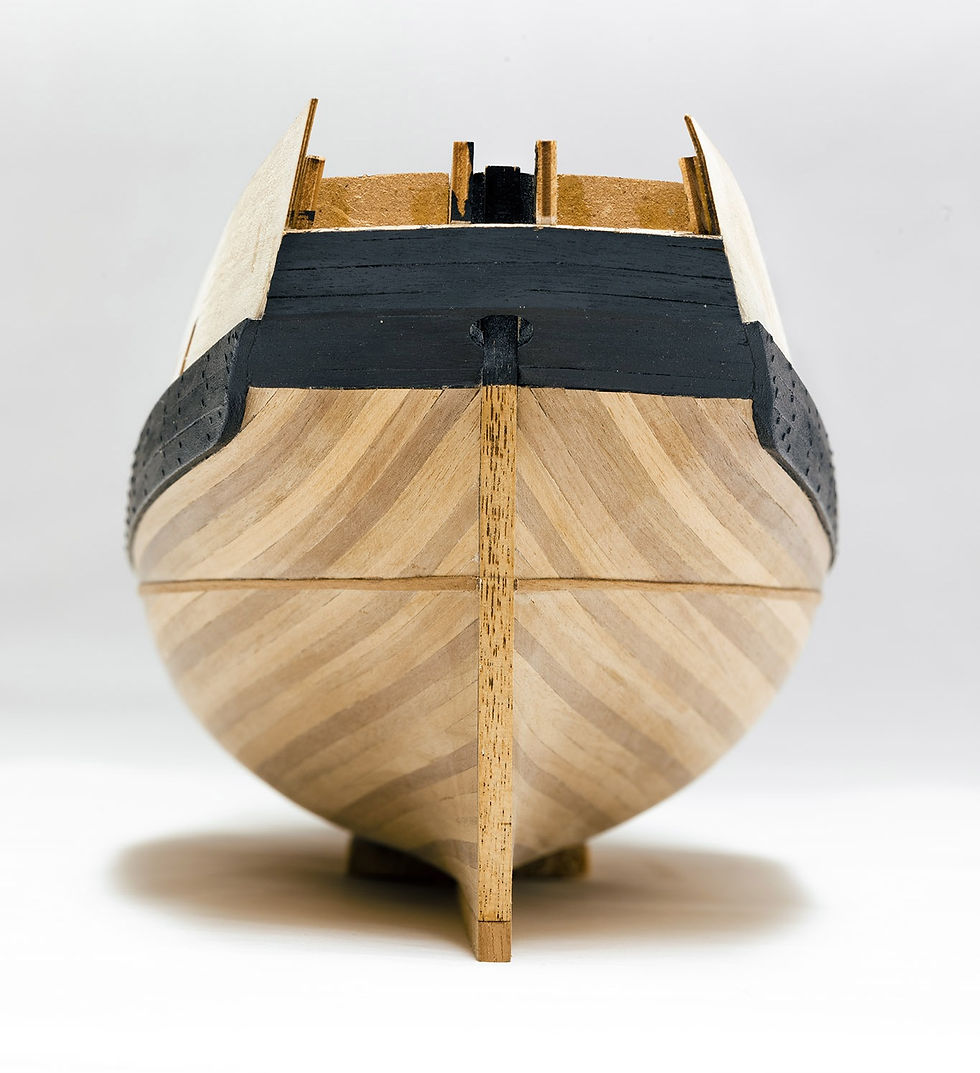
6.1. Finishing the hull:
Before the beginning of copper plating it is necessary to finish the hull. Install the keel, stem, stern and other parts, if any.
- If all parts are already installed on the model, go to the next step;
- glue the keel and the rest of the parts;
- make finish sanding of tthese parts for removing of possible traces of glue;
6.1. Завершення корпусу:
До початку обміднення необхідно закінчити повністю корпус. Встановити кіль, форштевень, ахтерштевень та решту деталей, якщо такі є.
- якщо всі деиалі вже встановленні на моделі, переходьте до наступного кроку;
- приклейте кіль та решту деиалей;
- зробіть фінішне шліфування встановлених деталей для виделння можливих слідів клею;

6. 2. Preparation of copper plates.
Some kits provide ready-made plates, and some provide material for their manufacture. Try to minimize contact with the front of the plates, as fingerprints can appear in a few hours and are very difficult to remove. Also, to simplify the process, some manufacturers may offer to paint the bottom in copper.
6.2.1. Imitation of copper plating with paint:
- Prepare the primer;
- Prepare paint and masking tape;
6.2.2. Using plates from the kit:
- Cut the plates if they are not cut;
- Sort them for starboard and port;
6.2.3. Making the copper plates:
- Skale the plates in the scale for your model. English and Dutch ships were copperd with plates of 48 "x15" (1220x381 mm) and slightly larger on French ships;
- Cut the plates according to how you will overlap 1.5 "(38 mm) or just join the plates.
6. 2. Підготовка мідних пластин.
Деякі комплекти надають вже готові пластини, а деякі надають матеріал для їх виготовлення. Намагайтеся мінімізувати контаки з фронтальною стороною пластин, так як відбитки паліців можуть проявитися через кілька годин і їх дуже важко видалити. Також для спрощення процесу деякі виробникм можуть запропонувати пофарбувати днище в колір міді.
6.2.1. При імітації обміднення фарбою:
- Підготуйте грунтовку;
- Підготуйте фарбу та малярну стрічку;
6.2.2. При наявних заготовках у комплекті:
- Розріжте пластини, якщо вони не розрізані;
- Відсортуйте їх для правого та лівого борту;
6.2.3. При виготовленні самостіно:
- Перерахуйте розмір пластин в масштаб вашої моделі. Англійські та Голландські кораблі обшивалися пластинами 48"x15" (1220х381 мм) і трохи більшого розміру на Французьких кораблях;
- Наріжте пластини з урахуванням того як ви будете робити обміднення в нахлест 1,5" (38 мм) чи просто стикувати пластини.
* If the manufacturer offers to simply paint the model, and you want to make real plates, it is best to use copper with a thickness of 0.03 mm (0.012 "). This is a fairly thin sheet that is easy to work with and it holds its shape unlike foil...
* Якщо в комплекті виробник пропонує просто пофарбувати модель, а ви хочете зробити реальні пластини, для цього найкраще використовувати мідь товщиною 0,03мм (0,012"). Це досить тонкий лист з яким легко працювати і він тримає форму на відміну від фольги...

6. 3. Preparation of the model for the coppering:
- Sand the hull with fine sandpaper 800-1000;
- Draw a water line along which the edge of the copper plates will fit.
6. 3. Підготовка моделі до обміднення:
- Відшліфуйте корпус дрібнозернистою шліфшкуркою 800-1000;
- Нанесіть ватерлінію по якій проходитиме кромка мідної обшивки.
6.4. The beginning of work.
In the original, wood has the attribute of narrowing and widening in contrast to copper sheets. Therefore, for additional fixation, the edge of the first row of copper plates was additionally nailed with a plank.
- If the scale of your model is very small, it makes no sense to imitate this bar;
- Install a wooden plank along the waterline.
6.4. Початок робіт.
В оригіналі деревина має влстивісьть звужуватися і розширятися на відміну від мідних листів. Тому для додаткової фіксації край першого ряду мідних пластин додатково прибивали планкою.
- Як масштаб вашої моделі дуже малий, то імітувати цю планку немає сенсу;
- Встановіть дерев'яну планку вздовж ватерлін.

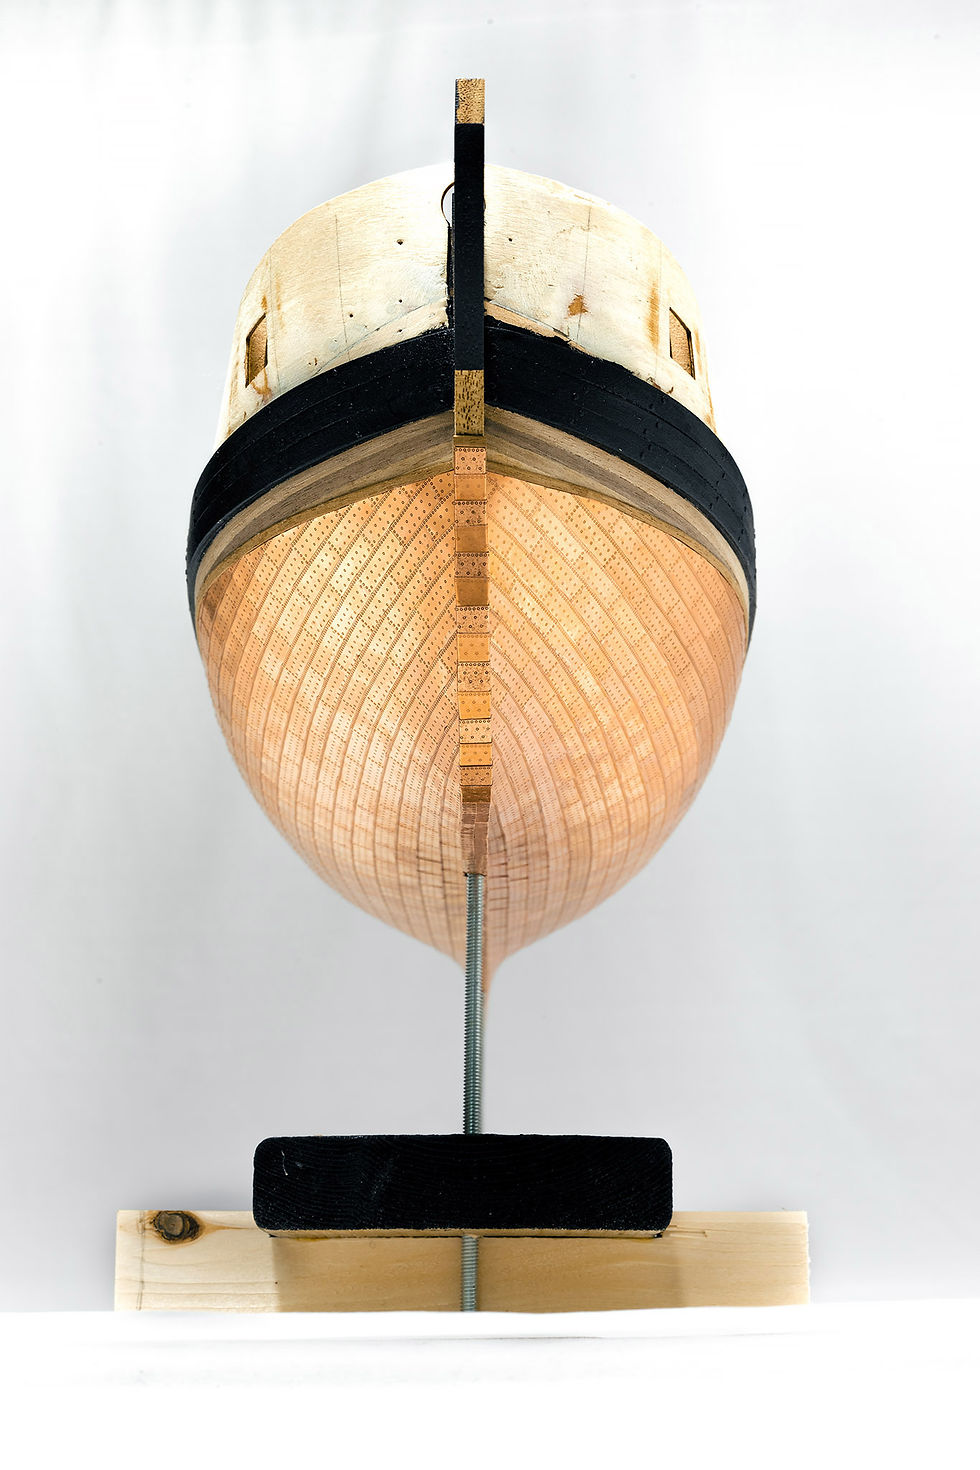
6.5. Making a copper plating or imitation.
Plates can be placed in two ways: overlap or laying the plates to butt. On the example of a kit with HMS PEGASUS, the manufacturer has made high-quality plates for overlapping. This simplifies the laying of the plates and helps to eliminate errors. Some manufacturers supply plates with imitation nails in such a way that the plates need to be butted.
6.5.1. Imitation with paint:
- Seal the hull of the coral with masking tape above the waterline;
- Glue the masking tape above the waterline of the ship's hull;
- In order to avoid peeling paint from a wooden surface, it must be primed. Only in the case of nitro paint, you can not do priming;
- Sand the primed surface with a sandpaper 240-400 grit;
- Paint the bottom with copper paint.
6.5.2. Making with overlapping plates:
- Mark the number of rows on the midframe, taking into account the overlap of the plates;
- Using masking tape, glue the guide plank to control the laying of the plates;
- For gluing plates it is very convenient to use thick cyacrine glue to fill cracks or gel. This type of glue does not harden instantly and you have a few seconds to properly position each plate;
- Clean the copperd hull from excess glue with toothpicks or steel wool, or with a rotary tool and a glass fibre brush.
6.5.3. Laying the plates to butt
6.5. Влаштвання мідної обшивки або іміиація.
Пластини можна вкладати двома способами: в нахлест або стикувати їх. На прикладі комплекиу з HMS PEGASUS, виробник зробив високоякісні пластини для улаштування внахлест. Це спрощує вкладання пластин і допомагає знівелювати помилки у розмітці. Деякі виробники постачають пластини з імітацією цвяхів таким чином, що пластини потрібно вкладати встик.
6.5.1. Імітація за допомогою фарби:
- Заклейте малярною стрічкою вище ватерлінії корпус корабля;
- Для того щоб уникнути лущення фарби з дерев'яної поверхні, її треба загрунтувати. Лише у випадку використання нітрофарби, можна не робити грунтування;
- Відшліфуйте загрунтовану поверхню шліфшкуркою 240-400 зернистітсть;
- Пофарбуйте днище мідною фарбою.
6.5.2. Улаштуванні пластин внахлест:
- Розмітьте кількість рядків на мідель шпангоуті з урахуванням накрою пластин;
- за допомогою малярної стрічки приклейте направляючу планку для контролю пкладання пластин;
- Для приклеювання пластин дуже зручно використовувати густий ціакріновій клей для заповнення тріщин або гель. Цей тип клею не застигає миитєво і у вас є в запасі кілька секунд для правильного позиціонування кожної пластини;
- Почистіть обшивку від надлишків клею за допомогою зубочисток чи сталевої вати, або за допомогою бормашинки з насадкою із скловолокна.
6.5.3. Вкладання пластин встик:
- У цьому випадку починати треба з обміднення кіля;
- Клей той самий і за такою ж технологією як і при влаштуванні пластин внахлест.
* Після завершення міжної обшивки - обов'язково полакуйте корпус целюлозним прозорим матовим лаком. Модель буде захищена від випадкових відбитків пальців, які можуть проявитися через кілька годин через окислення, але при цьому мідь продовжить натурально темніти і набувати старовинного кольору...
* After finishing the copper cladding - be sure to varnish the body with cellulose transparent matte varnish. The model will be protected from accidental fingerprints, which may appear in a few hours due to oxidation, but copper will continue to naturally darken and acquire an ancient color...
** When arranging the plates in the overlap - they should be placed from top to bottom. And when laying the plates to butt, it is better to do from the bottom up.
** При улаштуванні пластин в нахлест - вкладати їх треба починати зверху і вниз. А при стикуванніпластин, це краще робити знизу вверх.


I filmed the whole process in detail and made this video for you! You can find a playlist with the construction of HMS PEGASUS on my YouTube channel, and ask any questions to which you did not find the answers here!
Весь процес я зняла в деталях на відео і зробила для вас цей випуск! Ви можете знайти на моєму каналі плейлист з будівництвом HMS PEGASUS, та задати питання на які ви не знайшли відповіді тут!


Comments